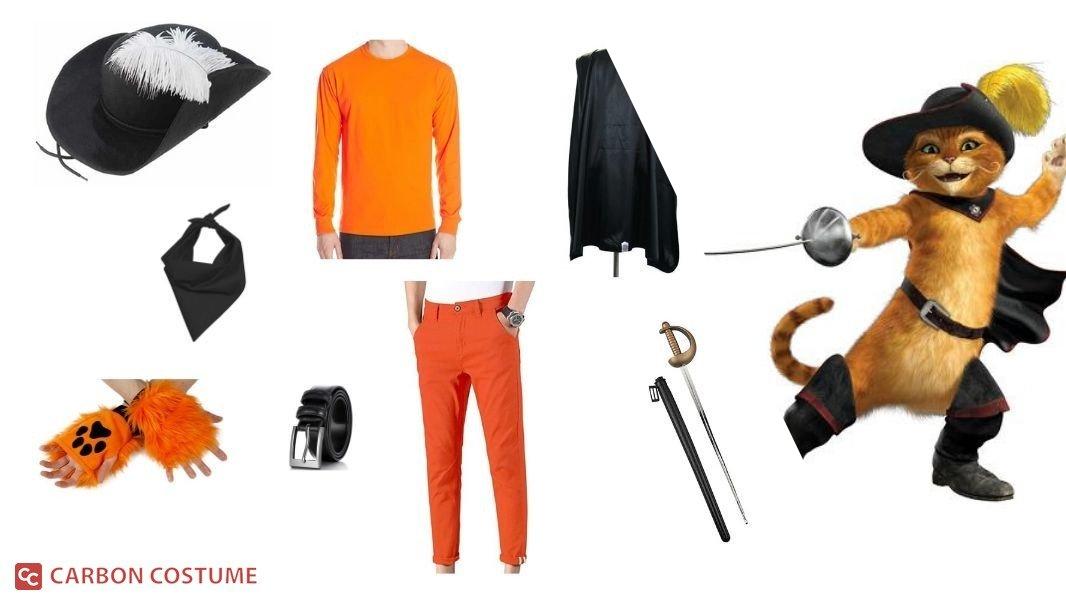
DIY Puss In Boots Hat: A Fun And Creative Craft Project For Kids And Adults
Mar 29 2025
Creating a DIY Puss in Boots hat is an exciting way to engage your creativity while enjoying a fun family activity. Whether you're hosting a costume party, preparing for a school event, or simply looking for a craft project, this guide will walk you through everything you need to know. With simple materials and step-by-step instructions, you can create your very own Puss in Boots hat that is both stylish and unique.
DIY crafts have become increasingly popular as people search for cost-effective and personalized ways to express their creativity. Making a Puss in Boots hat not only allows you to save money but also ensures that your creation stands out from store-bought alternatives. This project is perfect for beginners and can be completed in just a few hours.
In this article, we'll cover everything from the materials you'll need to advanced tips for customizing your hat. Whether you're a parent looking for a fun activity for your kids or an enthusiast who loves crafting, this guide will provide you with all the information you need to create a stunning Puss in Boots hat. Let's dive in!
Read also:Cmat Brit Awards A Comprehensive Guide To Understanding The Prestigious Music Event
Table of Contents
- Materials Needed for Your DIY Puss in Boots Hat
- Tools You’ll Need to Get Started
- Understanding the Design of a Puss in Boots Hat
- Step 1: Creating the Base of the Hat
- Step 2: Adding the Signature Colors
- Step 3: Incorporating the Signature Details
- Customization Ideas for Your Puss in Boots Hat
- Expert Tips for a Flawless Finish
- Estimating the Cost of Your DIY Puss in Boots Hat
- Conclusion: Your Perfect Puss in Boots Hat
Materials Needed for Your DIY Puss in Boots Hat
Before you begin your DIY Puss in Boots hat project, it's essential to gather all the necessary materials. Having everything ready will ensure a smooth crafting experience. Below is a list of materials you'll need:
- Cardstock or construction paper (black and white)
- Scissors
- Glue or double-sided tape
- Paintbrush
- Acrylic paint (black and white)
- Decorative elements (optional, such as sequins or ribbon)
These materials are readily available at most craft stores and are affordable, making this project accessible for everyone.
Tools You’ll Need to Get Started
In addition to materials, you'll also need a few tools to help you create your Puss in Boots hat. Here’s a list of tools you should have:
- Ruler
- Pencil
- Stapler
- Hot glue gun (optional)
These tools will help you achieve precise cuts and secure attachments, ensuring your hat looks professional and lasts longer.
Understanding the Design of a Puss in Boots Hat
Key Features of the Puss in Boots Hat
The Puss in Boots hat is iconic for its simplicity and elegance. It features a black base with white accents, mimicking the character's signature look. Understanding the design elements will help you replicate the hat accurately.
Some key features to focus on include:
Read also:Drake Bedroom Video The Untold Story And Its Impact On Pop Culture
- A tall, cylindrical shape
- White stripes or patterns
- A decorative ribbon or bow (optional)
Step 1: Creating the Base of the Hat
Begin by creating the base of your Puss in Boots hat. This is the foundation upon which all other elements will be built. Follow these steps:
- Cut a strip of black cardstock or construction paper. The length should be slightly longer than the circumference of the wearer's head.
- Form the strip into a loop and secure it with glue or a stapler. This will create the cylindrical shape of the hat.
Ensure the base is sturdy and fits comfortably on the wearer's head before moving on to the next step.
Step 2: Adding the Signature Colors
Once the base is complete, it's time to add the signature colors that make the Puss in Boots hat recognizable. Follow these steps:
- Paint or draw white stripes on the black base. You can use a ruler to ensure the stripes are evenly spaced.
- Allow the paint to dry completely before proceeding to avoid smudging.
The white stripes are a crucial element of the hat, so take your time to make them neat and precise.
Step 3: Incorporating the Signature Details
The final step involves adding the signature details that give the hat its unique character. Consider the following:
- Add a decorative ribbon or bow around the base of the hat.
- Use sequins or glitter to enhance the design if desired.
These details will elevate your hat and make it stand out, adding a personal touch to your creation.
Customization Ideas for Your Puss in Boots Hat
Adding Personal Touches
While the basic design of a Puss in Boots hat is straightforward, there are many ways to customize it to suit your preferences. Here are a few ideas:
- Use different patterns for the white accents, such as polka dots or swirls.
- Experiment with textures by using felt or velvet instead of cardstock.
- Add a feather or other decorative elements for a more elaborate look.
Customization allows you to make the hat uniquely yours while still maintaining the essence of the character.
Expert Tips for a Flawless Finish
To ensure your DIY Puss in Boots hat looks professional, consider the following tips:
- Use high-quality materials for better durability and appearance.
- Take your time with each step to avoid mistakes.
- Test the fit of the hat before completing the final touches.
These tips will help you achieve a flawless finish that you'll be proud to display.
Estimating the Cost of Your DIY Puss in Boots Hat
One of the advantages of creating a DIY Puss in Boots hat is its affordability. The cost of materials is generally low, especially if you already have some supplies at home. On average, you can expect to spend between $5 and $15, depending on the quality of materials you choose.
For those on a budget, consider using recycled materials such as old newspapers or magazines for the base and paint samples for the colors.
Conclusion: Your Perfect Puss in Boots Hat
In conclusion, creating a DIY Puss in Boots hat is a fun and rewarding project that anyone can enjoy. By following the steps outlined in this guide, you can create a hat that is both stylish and unique. Remember to take your time, incorporate your personal touches, and have fun throughout the process.
We invite you to share your creations with us in the comments below or on social media. Don't forget to explore our other craft guides for more inspiration. Happy crafting!
References: